

Oooops, if any of you entered in to check out this post a little while ago and wondered why I had not written any introduction to the post, I'm sorry, my bad !! The only thing I can think of is that I haven't had my cuppa tea yet and I guess it made me distracted, so I hit the post button before completing the post :-(
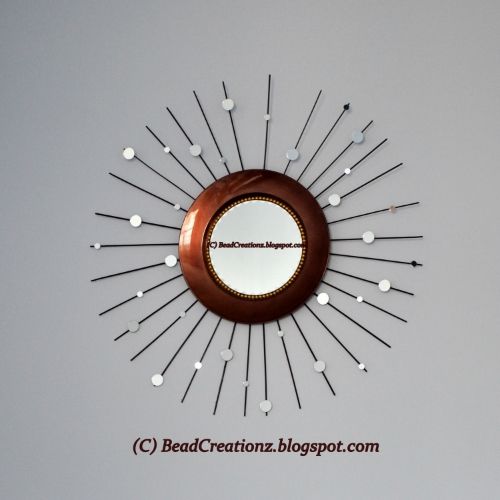
Anyway on to the post, I love sunburst mirrors but every time I see one in the stores or consider buying one, I keep thinking I can make something like this easily and will probably feel far more satisfied when I am done with it and hang it up on the wall than the store bought thing. Recently when I was in the craft store and came across some charger plates on sale, it struck me that these would probably serve well in creating a sunburst mirror and it did :) This was an incredibly quick project, the only things that slowed me down was the drying time for the skewers, mainly because we have had lot of rains recently and the high humidity caused slower drying times. Other than that, this was truly easy peasy and quick, perfect weekend project:)
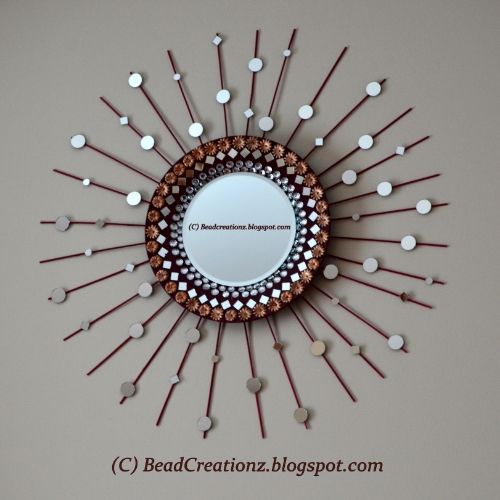
And here is the second mirror I made on similar lines, only made it a bit more decorative than the first one...
Things you will need to make this mirror.....
 A charger plate
a round mirror that will fit in the center of the charger plate ( I used a 7.5 inch mirror )
1 small plywood circle ( I used a plywood circle of 6.5 inches)
1 pack of bamboo skewers (or dowels, chopsticks or straws)
0 .5 inch small round mirrors as needed
1 inch round mirrors as needed
flat back pearl beads as needed to stick around the mirror
paint in the color of choice, I used rustoleum paint in kona brown glossy because that color matched my charger plate.
something that can be attached to the back of the plywood circle to hang the mirror (I used a thick cord)
glue gun/ any kind of glue that will work with plastic/wood.
 Attach the mirror to the charger. I used a 7.5 inch mirror, and the depth in my charger plate was 8.5 inches. I wanted that little extra space so that I could glue on some flat back pearl beads around the mirror. If you do not plan to do any decoration around the mirror, you can use the exact size that would fit right in the center of the charger plate. For the second one, I attached some rhinestones and small mirrors all around the charger plate to make it more decorative.
 Mark the placement positions of bamboo skewers on the plywood circle and either glue it and then spray paint the skewers or spray paint the skewers then glue to the plywood circle. For the first mirror I spray painted the skewers first, but found it gets a little tricky in that the skewers move a lot while spraying so it is a bit more difficult to get even color. For the second one, I glued the skewers to the plywood circle first then sprayed the whole thing.
Make a loop and attach the cord to the back of the plywood circle. Then attach the charger with mirror on top of the plywood + skewer arrangement. For this , I applied hot glue to the back of the charger plate and placed it on the plywood + skewers and pressed gently until it stuck to each other. Finally glue the small and large mirrors in a random placement on the skewers.
Allow it to dry. Enjoy your handiwork :)
Anyway on to the post, I love sunburst mirrors but every time I see one in the stores or consider buying one, I keep thinking I can make something like this easily and will probably feel far more satisfied when I am done with it and hang it up on the wall than the store bought thing. Recently when I was in the craft store and came across some charger plates on sale, it struck me that these would probably serve well in creating a sunburst mirror and it did :) This was an incredibly quick project, the only things that slowed me down was the drying time for the skewers, mainly because we have had lot of rains recently and the high humidity caused slower drying times. Other than that, this was truly easy peasy and quick, perfect weekend project:)

And here is the second mirror I made on similar lines, only made it a bit more decorative than the first one...

Things you will need to make this mirror.....

a round mirror that will fit in the center of the charger plate ( I used a 7.5 inch mirror )
1 small plywood circle ( I used a plywood circle of 6.5 inches)
1 pack of bamboo skewers (or dowels, chopsticks or straws)
0 .5 inch small round mirrors as needed
1 inch round mirrors as needed
flat back pearl beads as needed to stick around the mirror
paint in the color of choice, I used rustoleum paint in kona brown glossy because that color matched my charger plate.
something that can be attached to the back of the plywood circle to hang the mirror (I used a thick cord)
glue gun/ any kind of glue that will work with plastic/wood.


Make a loop and attach the cord to the back of the plywood circle. Then attach the charger with mirror on top of the plywood + skewer arrangement. For this , I applied hot glue to the back of the charger plate and placed it on the plywood + skewers and pressed gently until it stuck to each other. Finally glue the small and large mirrors in a random placement on the skewers.
Allow it to dry. Enjoy your handiwork :)
This is aweeesome Usha!! Looved the mirrors.. will try on my own though doubt if I will get all the craft items in Gurgaon:(
ReplyDeleteThanks Lavanya !! Not sure about Gurgaon, since I have never been there, but I know that most things are available in Bombay. So maybe on your next trip there you could pick it up if you do not find it in Gurgaon :)
Deletehi Usha....first time here, and glad that i did !! wow!! this is jsut great ! loved it..and definitely gonna go thru all ur other posts as well. do drop by my space too when you get the time. i write for 2 blogs - Quick Picks-all abt food and Picks Quicks - all other than food. :)
ReplyDeleteHi Usha,
ReplyDeleteThe mirror is simply awesome.Just a doubt --how did you glue the plywood +skewers onto the plate ?
Sorry I think I did not mention that in my post, will update now. But I applied hot glue to the back of the charger plate and placed it on the plywood + skewers and pressed gently until it stuck to each other.
DeleteHi Usha,
DeleteI tried to do my first sunburst mirror following your tutorial and it is so lovely .I am super delighted :-) .I tried the very simple method using skewers and plywood and the likes i got for it from friends and family is so encouraging ! Thank you so much for the tutorial and do continue the awesome creative work you are doing :-))