

Okay I know some of you may be wondering if this space is now going to be exclusively devoted to diy mirrors. No it isn't , it's just that I have finally gotten around to making some of the mirrors that I had been planning for a while now and coincidentally it seems that I ended up making almost all the mirrors around the same time. I promise to go back to more jewelry from my next post, in the meanwhile take a look at a new mirror that adds a touch of bling to one of our walls now.
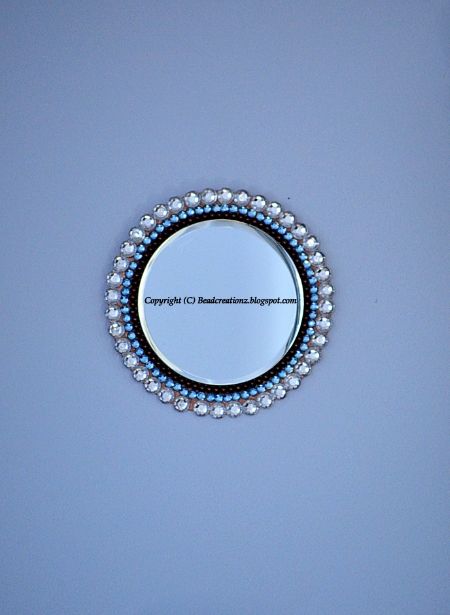
This mirror is made with beads, and rhinestones.It was a very simple and quick project and once I had assembled all the materials I needed for it, didn't take very long to complete. The completed mirrors are not very large, they are ideal for a very small bare wall that needs a little something to dress it up. I made a couple of these and also one slightly larger mirror that I made entirely with beads. Check the picture of the other mirror at the bottom of this post and do let me know what you think about both the mirrors........

Things you will need.....
5 inch round mirror
6 1/2 inch round plywood
1 string of beads of color of choice (I used a string of 4X6mm chocolate brown beads)
7 mm rhinestones of color of choice (I used light blue)
12 mm rhinestones color of choice(I used clear rhinestones)
Nylon thread to string the beads ( I use .25 mm fishing line that I got from the sports store that I use for beading sometimes)
Acrylic color of choice ( I used Martha Stewart's multi surface metallic rose copper paint that I had leftover from an earlier project)
Some thick or strong string ( like jute string) a few inches long to create a loop at the back to hang the mirror
Glue gun/ or other glue to stick beads and rhinestones
a pencil
Method :
Paint the plywood with the color of your choice. After it dries place the mirror in the center and mark a circle around it. This is not necessary, but I do this so that once I have hot glue on the back of the mirror I know the position for it, otherwise it might get stuck in a slightly odd position. Apply hot glue/ glue to the back of the mirror and stick it to the wooden circle.
String the beads together and place around the mirror to make sure you have the desired length. Loop the ends of the thread through the beads that are joining a couple of times to make sure it holds. Apply glue to the wood and stick the beads to the wood. Allow to dry.
Stick a row of 7 mm rhinestones. Then stick a row of 12 mm rhinestones. When dry form a loop with the thick string and attach it to the back of the wood with some glue. When dry hang wherever you want and enjoy :)
I used the same idea to create another mirror, this one does not have any rhinestones, only beads. Instead of one string of beads followed by rhinestones, in this mirror I just used 3 strings of beads. I have painted the wood a metallic golden color, and I left a small bit of wood showing because I did not want too many beads around the mirror, thought it would look too busy. I have hung this mirror in a room that has some green and brown tones so this kind of pulls both these colors together.

This DIY Mirror is off to the following events...
This mirror is made with beads, and rhinestones.It was a very simple and quick project and once I had assembled all the materials I needed for it, didn't take very long to complete. The completed mirrors are not very large, they are ideal for a very small bare wall that needs a little something to dress it up. I made a couple of these and also one slightly larger mirror that I made entirely with beads. Check the picture of the other mirror at the bottom of this post and do let me know what you think about both the mirrors........

Things you will need.....
5 inch round mirror
6 1/2 inch round plywood
1 string of beads of color of choice (I used a string of 4X6mm chocolate brown beads)
7 mm rhinestones of color of choice (I used light blue)
12 mm rhinestones color of choice(I used clear rhinestones)
Nylon thread to string the beads ( I use .25 mm fishing line that I got from the sports store that I use for beading sometimes)
Acrylic color of choice ( I used Martha Stewart's multi surface metallic rose copper paint that I had leftover from an earlier project)
Some thick or strong string ( like jute string) a few inches long to create a loop at the back to hang the mirror
Glue gun/ or other glue to stick beads and rhinestones
a pencil
Method :
Paint the plywood with the color of your choice. After it dries place the mirror in the center and mark a circle around it. This is not necessary, but I do this so that once I have hot glue on the back of the mirror I know the position for it, otherwise it might get stuck in a slightly odd position. Apply hot glue/ glue to the back of the mirror and stick it to the wooden circle.
String the beads together and place around the mirror to make sure you have the desired length. Loop the ends of the thread through the beads that are joining a couple of times to make sure it holds. Apply glue to the wood and stick the beads to the wood. Allow to dry.
Stick a row of 7 mm rhinestones. Then stick a row of 12 mm rhinestones. When dry form a loop with the thick string and attach it to the back of the wood with some glue. When dry hang wherever you want and enjoy :)
I used the same idea to create another mirror, this one does not have any rhinestones, only beads. Instead of one string of beads followed by rhinestones, in this mirror I just used 3 strings of beads. I have painted the wood a metallic golden color, and I left a small bit of wood showing because I did not want too many beads around the mirror, thought it would look too busy. I have hung this mirror in a room that has some green and brown tones so this kind of pulls both these colors together.

The Winthrop chronicles link it party
We did it Wednesday
Wow....I love all the mirror works this diy is so simple & presented clearly.
ReplyDeleteLove ur DIY projects..
Hi, Usha
ReplyDeleteThis is my first time I am visiting your blog, its simply fantastic. I just love those mirror work.
Beautiful, Usha. I love the first one the most. Thanks for the tutorial.
ReplyDeletei want to try everything on your blog. Glad I found you!
ReplyDelete